Crispy Homemade Potato Chips: No Soaking Required!
There's something uniquely satisfying about a perfectly crispy potato chip. That irresistible crunch, the savory seasoning, the way it complements almost any meal or stands alone as the ultimate snack. While store-bought bags offer convenience, nothing truly compares to the fresh, customizable deliciousness of
homemade potato chips. And what if we told you that making them at home could be even simpler than you imagined, without the traditionally recommended lengthy soaking process?
Today, as we celebrate the humble potato chip, let's embark on a culinary journey to create the crispiest, most flavorful chips right in your own kitchen. Forget the multi-hour prep; we're cutting straight to the chase, simplifying the process without sacrificing an ounce of that coveted crunch. This guide will show you how to achieve golden-brown perfection, proving that sometimes, less truly is more. Get ready to ditch the soggy myths and embrace the ease of exceptional
homemade potato chips.
The Myth of the Starch Soak: Why You Can Skip It
For years, the universal commandment for achieving perfectly crisp
homemade potato chips has been to "soak your sliced potatoes in cold water to remove excess starch." Recipes often demand anywhere from 30 minutes to a full two hours, sometimes even advocating for vinegar water for "ultimate crispiness." The theory is sound: starch can lead to gummy, less crisp results during frying. So, why would anyone challenge such an entrenched culinary wisdom?
The quest for culinary simplification often reveals surprising truths. What if the perceived necessity of soaking was, for most home cooks, an unnecessary extra step? Through rigorous experimentation, it's been discovered that the starch-soaking step can indeed be eliminated – *provided* you focus on one crucial factor: slice thickness.
When potatoes are sliced sufficiently thin (think 3mm or less), the starch issue becomes negligible. The rapid cooking time at high heat, combined with minimal internal starch to begin with in such thin slices, means that a lengthy soak simply doesn't improve the final product. It doesn't make the chips noticeably crisper, nor does it significantly alter their texture or color. Instead of a deep soak, a quick rinse to remove surface starch, followed by thorough drying, is all that's truly needed. This revelation transforms the process, cutting down significant prep time and making
homemade potato chips a much more spontaneous and accessible treat.
The Key to Crispiness: Precision Slicing
If soaking is out, then the secret weapon for unbelievably crisp
homemade potato chips lies squarely in your slicing technique. Thickness, or rather, *thinness*, is paramount. Aim for slices no thicker than 3mm. This precise measurement ensures quick, even cooking and allows the potato to dehydrate and crisp up beautifully in the hot oil without becoming chewy or soggy.
To achieve this level of precision consistently, a mandoline slicer is your best friend. Modern mandolins are incredibly sharp, easy to use, and often come with adjustable dial gauges allowing you to set exact thicknesses in millimeters. This consistency is vital, as unevenly sliced potatoes will cook at different rates, leading to some burnt chips and some undercooked ones in the same batch. When using a mandoline, always prioritize safety: use the provided food guard, wear cut-resistant gloves if you have them, and never rush the process.
If a mandoline isn't an option, a very sharp chef's knife and a steady hand can still produce excellent results. Take your time, focus on evenness, and try to cut as thinly as possible. Remember, practice makes perfect!
After slicing, a quick rinse under cold running water in a bowl will wash away any loose surface starch. This is a crucial distinction from a long soak; we're just cleaning the surface, not trying to extract starch from deep within the potato. Once rinsed, drain the potatoes thoroughly and then comes another critical step: *drying*. Pat them meticulously dry with paper towels or use a salad spinner to remove as much moisture as possible. Excess water on the potato slices will cause the oil to splatter violently and lower the oil temperature, leading to less crisp chips.
Frying Your Way to Perfection: Oil, Temperature, and Technique
With your perfectly sliced and dried potatoes ready, it's time for the magic to happen in the fryer. The choice of oil and maintaining the correct temperature are non-negotiable for achieving that coveted golden crisp.
Choosing the Right Oil
For deep frying, select an oil with a high smoke point and a neutral flavor profile. Vegetable oil, canola oil, sunflower oil, or peanut oil are all excellent choices. They can withstand the high temperatures required for frying without breaking down and imparting off-flavors to your chips. One significant advantage of these oils is their stability; you can often reuse them for several batches of frying before needing to replace them, provided you strain out any food particles and store the cooled oil properly. Replace the oil when it starts to look dark, murky, or develops an unpleasant odor.
Achieving the Ideal Temperature
The optimal frying temperature for
homemade potato chips is between 300°F and 365°F (150°C - 185°C). Using a deep-fry thermometer is highly recommended to monitor the oil's temperature accurately. If the oil is too cool, the chips will absorb too much oil and turn out greasy and limp. If it's too hot, they'll burn on the outside before cooking through, resulting in a bitter taste and an unappetizing texture.
The Frying Process
1.
Heat the Oil: Fill your deep fryer or a heavy-bottomed pot with enough oil to submerge the chips completely. Heat it to your target temperature (around 325-350°F initially).
2.
Fry in Batches: Do not overcrowd the fryer. Frying too many chips at once will drastically lower the oil's temperature, leading to soggy results. Fry in small batches, giving the chips plenty of space to move around and cook evenly.
3.
Watch for Color and Sound: Carefully add the dried potato slices to the hot oil. They will initially bubble vigorously. As they cook, the bubbling will subside, and the chips will begin to turn a beautiful golden brown. Listen for the sound of the frying – it will change from a vigorous sizzle to a lighter, crispier sound as moisture leaves the chips.
4.
Drain and Season: Once golden brown and crisp, remove the chips with a slotted spoon or spider and transfer them immediately to a wire rack set over a baking sheet lined with paper towels. This allows excess oil to drain away, preventing greasiness.
5.
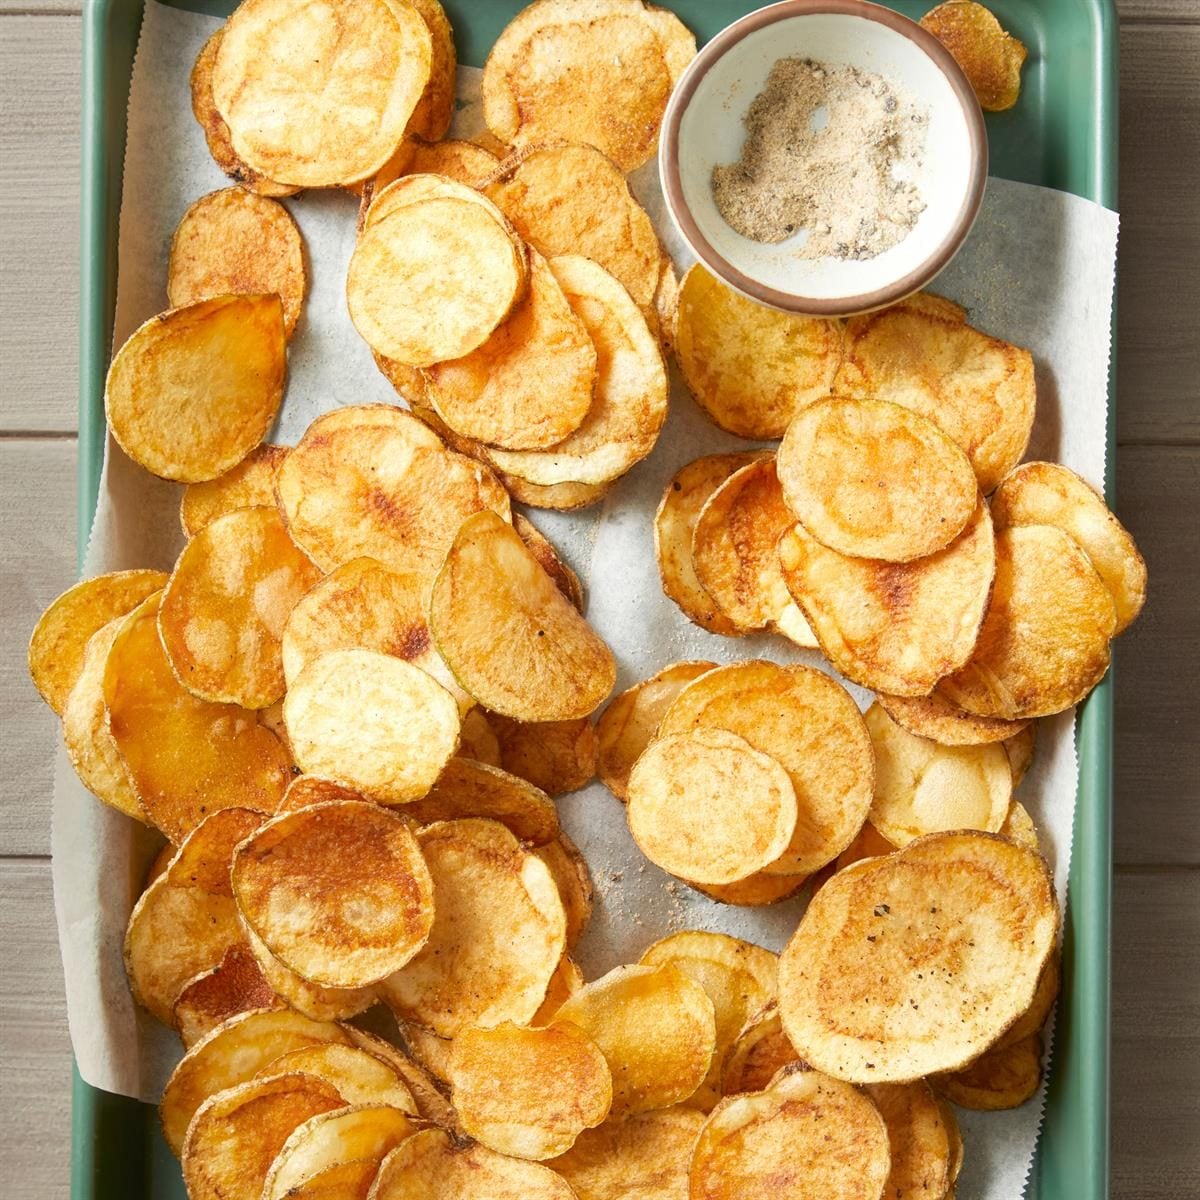
Season Immediately: This is crucial! While the chips are still hot and slightly oily, sprinkle them generously with fine salt or your chosen seasonings. The heat helps the seasonings adhere better.
For more detailed tips on achieving that perfect crunch, you might find
Fry Perfect Homemade Potato Chips: Crispier Than Store-Bought an invaluable resource.
Beyond the Basics: Customizing Your Homemade Chip Experience
One of the greatest joys of making
homemade potato chips is the ability to customize them exactly to your liking. Gone are the days of being limited to just plain or sour cream and onion!
Potato Varieties
While most potatoes can be turned into chips, some varieties are better suited for frying. Russet potatoes, with their high starch content and relatively dry flesh, are a top choice, yielding a classic, hearty chip. Yukon Gold potatoes offer a slightly creamier texture and a beautiful golden color. Experiment with different types to find your personal favorite!
Seasoning Sensations
The moment your chips come out of the oil is your canvas for flavor. Beyond classic sea salt, consider these enticing options:
*
Salt & Vinegar: A classic for a reason! Sprinkle with fine salt and then spritz or lightly toss with white vinegar while still warm.
*
Smoky Paprika & Garlic: Combine smoked paprika, garlic powder, and a touch of onion powder for a robust, savory kick.
*
Cajun Spice: A blend of cayenne pepper, garlic powder, onion powder, oregano, and thyme for a spicy, aromatic profile.
*
Rosemary & Sea Salt: Finely chopped fresh rosemary mixed with flaky sea salt provides an elegant, herbaceous flavor.
*
Chili-Lime: A zesty combination of chili powder, a pinch of cayenne, and lime zest.
Making your own chip flavors opens up a world of possibilities. Think about your favorite spice blends or international flavors and get creative!
Serving Suggestions
Homemade potato chips are incredibly versatile. They are, of course, a stellar stand-alone snack, perfect for movie night or game day. But don't limit them! They make an excellent side dish for:
* Juicy hamburgers or hot dogs
* Classic sandwiches like a French dip, grilled cheese, or tuna melt
* Hearty soups or stews, adding a delightful crunch
* Picnics and backyard barbecues
They also make a fantastic, unexpected garnish for dishes needing a textural contrast. For a comprehensive overview of the entire process from slicing to seasoning, consider reading
Your Guide to Homemade Potato Chips: Slicing, Frying, & No Soak.
Conclusion
The journey to perfect
homemade potato chips doesn't have to be fraught with time-consuming steps. By focusing on precision slicing and proper frying techniques, you can confidently skip the lengthy soaking process and still achieve chips that are superior in taste, texture, and freshness to anything you'll find in a bag. They're preservative-free, endlessly customizable, and carry the unparalleled satisfaction of something made with your own hands. So, grab your potatoes, fire up that fryer, and prepare to delight your taste buds with truly crispy, truly simple, truly incredible homemade potato chips. You'll never look back.