The Irresistible Allure of Homemade Potato Chips
There's a universally acknowledged truth in the culinary world: homemade often trumps store-bought. And nowhere is this more evident than with potato chips. Forget the mass-produced, sometimes stale, and always additive-laden bags from the grocery store. Once you experience the golden-brown crunch, the customizable seasoning, and the sheer freshness of homemade potato chips, there's truly no turning back. They are not just a snack; they are an experience – perfect as a stellar side for a juicy hamburger, a comforting soup, or simply a bowl to devour during movie night.
For years, the conventional wisdom for achieving the ultimate crispy homemade potato chips involved a tedious, often hours-long soak in cold water. The belief was that this lengthy bath was essential to remove excess starch, thereby preventing sticking and ensuring maximum crispness. However, we're here to share a revolutionary, simpler method that eliminates this time-consuming step without sacrificing an ounce of crunch. Get ready to simplify your snack game and dive into making the best homemade potato chips you've ever tasted, even without the soak! For more in-depth insights into this streamlined approach, discover why you don't need to soak your spuds in our guide:
Crispy Homemade Potato Chips: No Soaking Required!
The Art of Slicing: Precision Without the Pre-Soak
The secret to perfectly crispy, no-soak homemade potato chips lies not in a lengthy bath, but in the precision of your slice. Achieving consistent, ultra-thin potato slices is paramount for even cooking and that coveted delicate crunch.
Why Thin Slices are Your Secret Weapon
When potatoes are sliced uniformly thin – ideally 3mm or less – they cook quickly and evenly. This rapid cooking allows the moisture to escape efficiently, resulting in a crisp texture without the need for extensive starch removal through soaking. Thicker slices, conversely, retain more moisture and starch, leading to a chewier or even soggy chip if not cooked for longer at a lower temperature, which can also absorb more oil. Experimenting with different thicknesses (say, 1.5mm, 2mm, and 3mm) reveals that as long as you stay within this thin range, the difference in final crispness is negligible, yet the consistency across your batch remains crucial.
Choosing Your Slicing Tool
While a very sharp knife and a steady hand can achieve thin slices, a mandoline slicer is truly a game-changer for homemade potato chips.
*
Mandoline Slicer: This tool is highly recommended for its ability to produce consistently thin, uniform slices with ease and speed. Look for one with a dial gauge that allows you to set specific thicknesses in millimeters. The sharper the blade, the less effort required, leading to cleaner cuts and reduced risk of injury. A good mandoline not only makes the process faster but also ensures every chip cooks evenly, minimizing burnt edges or soggy centers. Many models also offer julienne and other cuts, adding versatility to your kitchen arsenal.
*
Sharp Knife: If you don't have a mandoline, a very sharp chef's knife can work. The key is to take your time and aim for the most uniform slices possible.
*
Food Processor Attachment: Some food processors come with a slicing disc that can also be used for potatoes. Ensure the disc can achieve thin enough slices.
Once your potatoes are sliced, a quick rinse in a bowl of cold water until the water runs mostly clear is still beneficial. This removes any surface starch that could cause sticking or excess browning. After rinsing, it's absolutely critical to dry your potato slices thoroughly. Gently shake them dry in a colander, then roll them in a clean kitchen towel or use paper towels to blot away every last drop of moisture. Excess water can cause the hot oil to splatter dangerously and will prevent your chips from becoming crisp.
Frying Your Way to Golden Perfection
With your meticulously sliced and dried potatoes ready, the next step is the glorious transformation into crispy, golden chips through deep frying. This stage demands attention to detail, particularly regarding oil choice and temperature control.
The Right Oil Makes All the Difference
Choosing the correct frying oil is fundamental to the taste and texture of your homemade potato chips. You need an oil with a high smoking point and a neutral flavor that won't overpower the delicate potato taste.
*
Recommended Oils: Vegetable oil, canola oil, and peanut oil are excellent choices. They meet both criteria – high smoke point (typically above 400°F/200°C) and a clean, neutral flavor profile.
*
Oil Maintenance: For repeated use, especially if you have a deep fryer, you can typically reuse frying oil several times. Filter the oil through a fine-mesh sieve or cheesecloth after each use to remove any food particles, which can burn and taint the flavor. Store the filtered oil in an airtight container in a cool, dark place. Replace the oil when it starts to look significantly darker, appears murky, or develops an "off" smell, indicating it’s beginning to go rancid.
Temperature Control is Key
Maintaining the correct oil temperature is crucial for perfect results. If the oil is too cool, the chips will absorb too much oil and turn out greasy and soggy. If it's too hot, they'll brown too quickly on the outside, potentially burning before the inside is cooked through, leaving them brittle or bitter.
*
Ideal Temperature Range: Aim for an oil temperature between 300-365°F (150-185°C). A thermometer (clip-on candy thermometer or instant-read thermometer) is invaluable here.
*
Batch Frying: Never overcrowd your fryer or pot. Frying too many potato slices at once will drastically drop the oil temperature, leading to greasy chips. Fry in small batches, giving the chips enough space to move freely and cook evenly.
*
Cooking Process: Once the oil is at temperature, carefully add a single layer of potato slices. They will bubble vigorously as moisture escapes. As they cook, the bubbling will subside, and the chips will start to turn a light golden brown. Use a slotted spoon or spider to gently stir them occasionally to ensure even cooking.
Achieving That Signature Crisp
Your chips are ready when they are beautifully golden brown and the bubbling has significantly reduced, indicating most of the moisture has evaporated. They should look crisp even in the oil.
*
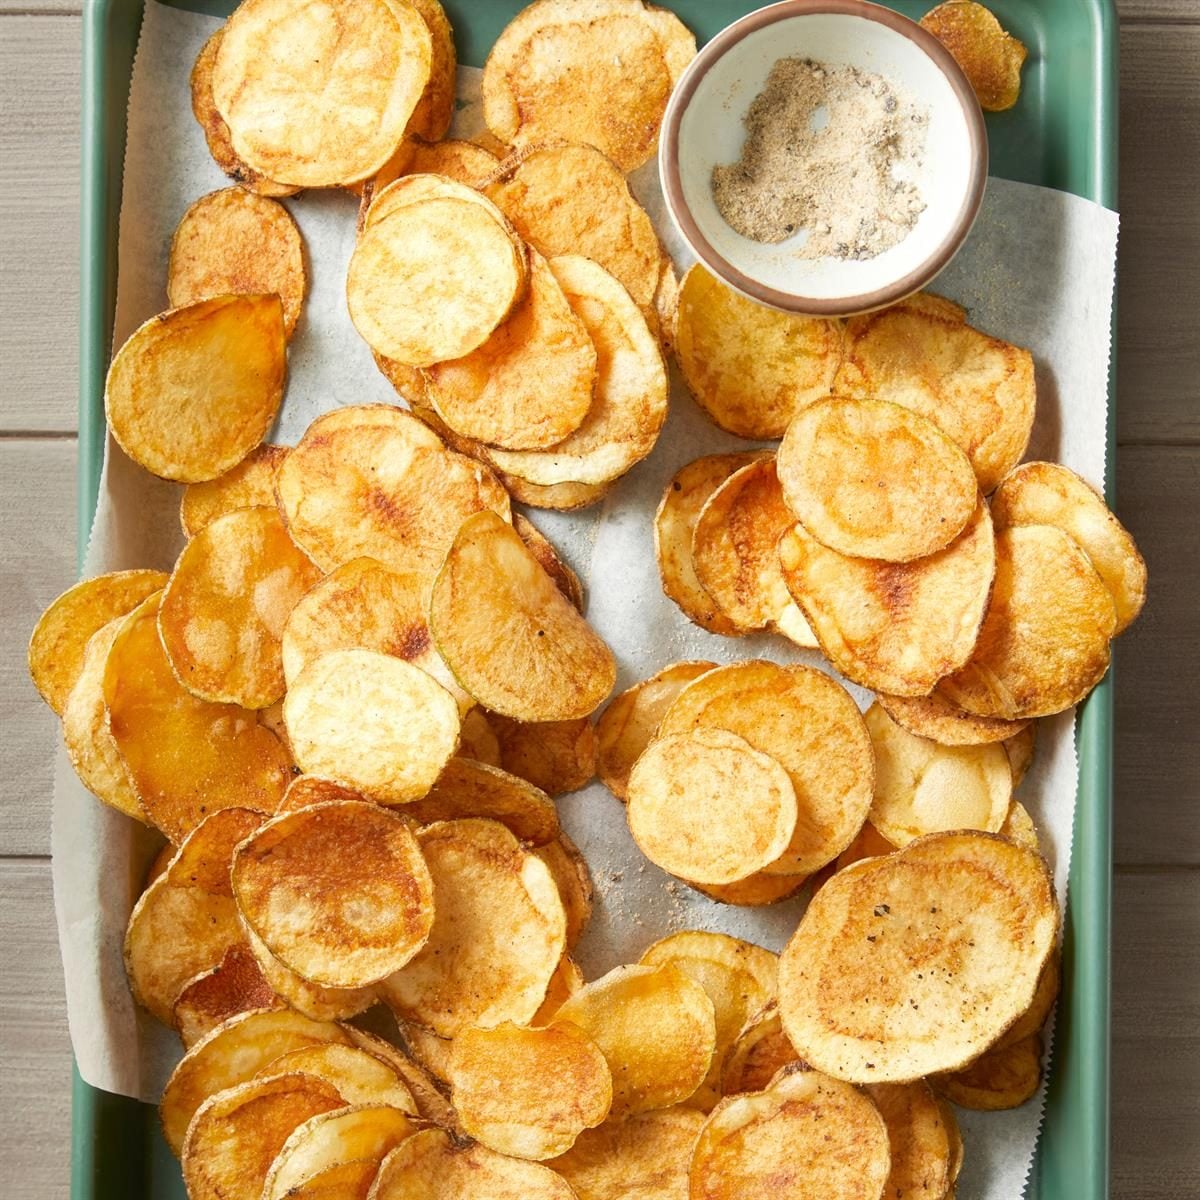
Draining: Promptly remove the cooked chips from the oil using a slotted spoon or spider. Transfer them immediately to a wire rack placed over a baking sheet lined with paper towels. This allows excess oil to drain away from all sides, preventing them from becoming soggy.
*
Seasoning: The most crucial tip for seasoning is to do it while the chips are still hot from the fryer. The residual heat and oil allow the salt and other seasonings to adhere properly.
For more expert advice on deep-frying techniques and ensuring your homemade chips are perfectly crisp every time, be sure to read our comprehensive guide:
Fry Perfect Homemade Potato Chips: Crispier Than Store-Bought.
Customizing Your Crisps: Beyond Just Salt
While a simple sprinkle of fine sea salt on warm, crispy chips is undeniably delicious, one of the greatest joys of making homemade potato chips is the freedom to customize your flavors. Say goodbye to the limited options of store shelves and hello to a world of culinary creativity!
Flavors to Ignite Your Palate
Beyond the classic salt, the possibilities for seasoning are endless. Remember to apply your chosen seasonings immediately after the chips come out of the fryer, while they are still hot and slightly oily, allowing the flavors to cling perfectly.
*
Classic Salt & Pepper: A timeless combination. Use finely ground salt so it adheres well.
*
Paprika Power: A sprinkle of sweet paprika adds a warm, subtly smoky flavor and a beautiful reddish hue. For a kick, try smoked paprika.
*
Garlic & Onion Powder: Combine these for a savory, aromatic blend reminiscent of your favorite sour cream and onion chips.
*
Cheese Dust: Finely grated Parmesan or nutritional yeast can create a cheesy flavor profile that's utterly addictive.
*
Spicy Kick: A pinch of cayenne pepper, chili powder, or even a dash of ghost pepper powder for the adventurous, will add a fiery punch.
*
Herbal Delights: Dried dill, parsley, or rosemary (finely crushed) can lend a sophisticated, fresh note.
*
Vinegar Zing: For those who love salt and vinegar chips, a dusting of vinegar powder (available online or in specialty spice stores) is a game-changer.
*
Ranch or BBQ Seasoning: Use your favorite store-bought spice blends for a familiar, comforting flavor profile.
Feel free to mix and match! A blend of garlic powder, onion powder, and a touch of paprika makes for a fantastic all-purpose seasoning. The beauty of homemade chips is that you can make small batches with different seasonings to satisfy every craving.
Choosing the Best Potatoes for Chips
The foundation of any great potato chip is, naturally, the potato itself. Not all potatoes are created equal when it comes to frying, and selecting the right variety can significantly impact the final texture and taste of your chips.
For frying, you'll want to gravitate towards
starchy or
floury potato varieties. These potatoes typically have a lower moisture content and higher starch levels compared to waxy potatoes. This composition is ideal for frying because:
*
Less Moisture: Lower water content means less time in the fryer to achieve crispness, resulting in less oil absorption and a lighter, airier chip.
*
Higher Starch: The starch in these potatoes fries up beautifully, contributing to that desirable crisp, almost brittle texture.
Recommended Varieties:
*
Russet Potatoes (also known as Idaho potatoes in the US): These are often considered the gold standard for homemade potato chips. Their high starch content and relatively dry flesh make them perfect for frying into crisp, golden chips.
*
Maris Piper (UK): A popular all-rounder in the UK, Maris Piper potatoes are also excellent for chips due to their floury texture.
*
Kennebec: Another good option known for its excellent frying qualities.
Avoid waxy potatoes like Yukon Gold or red potatoes for chips, as their higher moisture content and lower starch levels tend to result in denser, chewier, and less crisp chips that absorb more oil.
Conclusion: Your Crispy Journey Awaits
Making homemade potato chips is a rewarding culinary endeavor that brings unparalleled freshness and flavor to your snacking experience. By embracing the "no-soak" method and focusing on precise slicing and meticulous frying techniques, you'll discover a simpler, faster path to gourmet-level chips right in your own kitchen. From the satisfying crunch to the endless possibilities of custom seasoning, homemade chips offer a customizable treat that truly leaves store-bought varieties in the dust. So, grab your potatoes, fire up your fryer, and prepare to embark on a delicious journey that will forever change your perception of this beloved snack. Your taste buds (and your family!) will thank you for it.